Friday, May 8, 2009

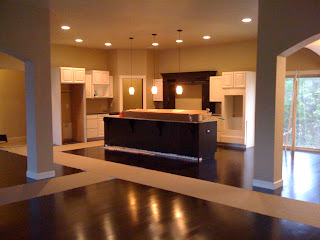
House as is

So, we have been in for two weeks now, I can't believe it has been that long (well, we moved in two weeks ago Saturday, but still).  Most things are settled in, the kitchen is unpacked, the bedroom is [mostly] unpacked, and we have piles of storage hanging out in the bonus room.  And this week we managed to clean out the garage and park our cars in there!  Which was exciting because it has been since last AUGUST since I was able to do that.  And I missed it terribly!
You can see that the bar has become a place to hold junk [for a lack of better word] but that will NOT be the case!  I am determined to keep it spotless.
And in our dining room, that mirror needs to be hung on the wall, and I have to find candles and stuff like that.  

We have since moved the dog kennel into a spare bedroom.  
This is just a peek at what it looks like with furniture.  I will eventually take beautifully staged, fake photos to post!  And don't worry, the projects arent over.  We are working on the backsplash this weekend and apparently Brad has plans for a built in entertainment center (that we are to build!) We will see how that goes!

Monday, May 4, 2009

The grass is greener...

In my yard.  Or at least it is now after all the rain!
We moved into the house a week ago Saturday.  Everything is in, but not necessarily in its place.  This past weekend we had rain.  But not just any rain – torrential, can see to drive rain all day Saturday.  So, we thought that would be a great time to head to Home Depot to get some plants!  OK, truth is, in order to close on the house, it has to be appraised and in order to do that, the yard must be landscaped.  So it had to be done, rain or shine (literally).
Here is the finished product:

We have one flower bed in front of the garage, another that wraps the other corner and a large one out in the front.  We used brown metal edging from Lowe's, a double hammered hard wood mulch (that we got by the truckload! from a nursery just up the road from us.  The mulch was cheap, $30.00 for what they call a 'yard,' which is enough to fill up the back of a truck bed.  But the plants were WAY overpriced.  i.e. the hosta's I picked up at Lowe's for $4 each were $32 each there! And they were even the same size.) and most of our plants came from Home Depot  – not that we don't love Lowe's but now HD is closer!
I adore these spiral topiary trees!  The green pops against the rock and they have an elegant look that I really love.  

Here, we had to put a bed of river rocks against the house to help with drainage.  Another 'swirly' tree, hostas and some evergreens.

We used a lot of azelea's, mostly because they were only $3 each!

The purple grass-like plant is called cordaline, but we just call it purple grass (clever, I know).  The tree is a Japanese maple.  We both really like the red/purple ones, but that variety is a bit more expensive and we wanted a more mature (read taller) tree in this spot, so we chose this one instead.  I like it.  The tips of some of the leaves are reddish, and will probably turn that color in the fall.  Also, both of our neighbors have the purple Japanese maples, so this makes ours different.

Friday, April 24, 2009

We're moving in!!!

Well, Brad waited around the house today for the inspector and walked through the house with him.  Due to some staffing issues at their office, they were actually able to sign and hand over our certificate of occupancy.  We can officially live in our house now!  So, we will be moving tomorrow.
And of course, I have a work conflict.
But thats another post for another blog ;)

Thursday, April 16, 2009

Final touches on the kitchen

We have been getting the final little bits done lately.  And it's been hectic!  (On another note, Brad's mom broke her hip and is in the hospital, so we've also been working with that).

Last Friday was a busy day.  We got the marble vanity tops installed in the master bathroom, the appliances installed in the kitchen, the carpet was worked on, the front door was installed, the deck was started and the cedar shake siding was installed!  WOW!  Busy! 

Here are a few photos of the kitchen to hold you over! 
This is a faucet I picked up on Ebay (love it!!) for $150.  It retails for $250.  It was new in box.  The faucet pulls out.  You might be able to look close at the granite- between the faucet and the soap dispenser, there's another hole.  :( We told the granite guy to put three holes (faucet, soap and air gap) BUT, apparently the code does not require an air gap if you have a garbage disposal. So, we have an extra hole.  Which I am not pleased about.  It's fixable- another soap dispenser, covering it with the metal flange thing that came with the faucet kit (if the plumber can find it...I gave it to him!) or putting a fake air gap on, or just putting an oil rubbed bronze plug.  It's not the end of the world, but I'm not super happy about it either, and it's totally our fault.
Here are the cabinets with our double oven!  The oven is a 30 inch, and the cabinet is 31 inches.  Needless to say, it's a tight fit.  Technically, a 31 inch cabinet is for a 27 inch oven.  We should have gotten a 34 inch cabinet.  It looks fine, but it was so close!
You can also see the hardware, which I installed all by myself!  Got them from Target.  The handles were $9.99 for 6 and the bin pulls (on the drawers) were $4.99, but totally worth the extra cost. Thanks again to Amy for picking some up for me out of town!
Here is the shiny, new refrigerator.  We built this cabinet using two pieces of MDF and wrapping the outside with bead board.  We bought the top 24 inch cabinet and it doesn't actually reach the back of the wall.  It was the cheapest option to have the built-in look without the built-in cost! 
More to come soon.  We are having an issue with rain/dirt/sod and a tiny run-in with the EPA! Oops!

Wednesday, April 8, 2009

Seeing their new home

We brought the puppies with us to visit their new home for the first time.  I was in the great room with them, Brad was working on scrubbing the grout off the tile floor in the hallway.  He kept walking in front of the house. 
This is Presley, he is a Shih Tzu-Poodle mix.  
And he's slightly bow legged when he stands up!

The pups went crazy watching him.  They are definitely going to love these giant windows.
They are just tall enough to get their tiny paws up on the window sill and peek their tiny noses over.   
Phoebe is a Miniature Daschund, and had beautiful coloring.

Tuesday, April 7, 2009

So close, I can taste it

We spent this past weekend doing the most painful thing we have had to do. 
Laying 1,000 square feet of bamboo floors.
We started on Sunday, laying down four rows.  You have to establish a base to work off of.  It should be just a few rows.  We needed to get down four to go around a bump out pillar and make sure that the flooring was straight all the way across.

This had to dry for at lease 24 hours.  We let it sit until the next weekend.  On Friday, we swept and mopped the concrete again and started. 

That was about 8 hours of work.  We had a few spots where the floor was unlevel, so we placed the heavy buckets of glue there to hold it down.  We finished almost everything by Saturday around 10:30 p.m.  After a good 12 hours of back-breaking work! All that we had to do on Sunday was inside the refrigerator cabinet and in the pantry.

We used three rolls of blue tape!  The tape helps hold the boards together while we were working on another area.  Those little guys would slide around and leave tiny gaps, so the tape was helpful.  But a bit of a pain to get up.  OK, the tape wasn't a pain, but my knees were definitely hurting by day 3, so any movement that wasn't laying on a couch was pain!

Here is the kitchen floor, with my beautiful, antiqued cabinets. 

And from the other side.
The dining room.
And this is what it looks like right now. We put down paper for people to walk on.  There won't be very many people in the house besides us (plumber, carpet guy, trim guy to install the front door), but it's nice for us to have too.  I took my shoes off so many times on Sunday!  Walking to and from the garage cutting the baseboards.

It's almost done.  I can just imagine what kinds of meals I can make in my kitchen.  What my couch will look like in the living room!  
This is what is left:
-The grinder pump needs to be finished and turned on. (they were working on this yesterday at 6 when I stopped by the house.  Unless MAJOR catastrophe hits, it will be done today)
-The driveway needs to be poured.  They framed it Friday and promised to come back Monday.  They did not.  I heard they were pouring someone else's foundation, but would be out today.  We'll see.
-Granite in the master bathroom counter tops.  It's been two weeks, and they haven't gotten to ours.  Apparently all the great things we told everyone about them got them too busy and they haven't had time... (Today?  Tomorrow?)
-Plumber needs to install all the fixtures.  This cant be done until grinder pump and counters are in.
-Level the lot. [again] My uncle did it, but the rain washed it all away.  So he will be out next tuesday/wednesday.  (depending on the weather.  These April showers are killing me.)
-Sod.  Of course this is waiting on the grinder pump, driveway, and of course, leveling. We are planning to have it delivered Thursday of next week.
-Install the front door.  He will be there on Wednesday to take care of that.  Can't wait.
Then we can move in.

Thursday, March 26, 2009

Island Lights

We finally got to hang our lights over the island.  The electrician put the wires in the ceiling, but did not cut any holes.  He wanted to wait until we had the island installed so that he could make sure they are equally spaced apart.  The middle one is centered right in the middle, the far left [from this perspective] is right over the sink.  And despite being small, they light the place up pretty well.
I found these guys at Lowe's (did you even wonder?) and fell in love with them!  They have a great crackle finish and blobs of blackish spots that actually have glitter in them.  Sounds strange, but looks really nice. (Except the glitter kind of scratches your hand when you try to screw in the bulb!) And they were only $12 each.When we finally went to pick these up, wouldn't you know it, I could only find one.  So I clutched it to me, searching in vain for two more.  No luck.  So we get to the check out, where one of the guys we know starts teasing us.  I mention how I couldn't find any more of these globes.  Within a few minutes, someone else appears with 4 more! I was super excited.  I ran right into the house and put them up.  Brad might have had to pull me away so we could unload the heavy thing from the truck.  

Wednesday, March 25, 2009

Showers of praise

So, the shower has been a small source of problem since pretty much day 1.  I knew exactly what I wanted, and the boys thought that was too difficult and stubbornly refused to do what the shower needed.  Which was 1. Construct a custom shower pan (you know, layers of concrete, rubber membrane, more concrete, all sloped in to drain properly) 2. Build a bench so I can shave my legs (and give me a place to use the 4 foot x 1 foot x 1 inch thick piece of travertine I have been dragging around for a few years now) 3. Tile everything.  The walls, the floor, the bench.
They said no.  So I priced a custom cultured marble floor 5 foot x 5 foot, was about $750.  Not bad, but then I thought it wouldn't match, SO the boys built a shower pan for me!  We ripped down the green board the dry wallers put up, replaced it with concrete backer board, and then sealed the seams and screw holes.  And then the fun began!

Here is my brother-in-law, beginning the wall where the faucets will be. 
He began by screwing a board into the wall, and starting with whole tiles set on a diagonal.  This was in case the floor was not perfectly level.  If it wasn't and we started at the bottom, it could have made the whole shower crooked.  So you pick a point towards the bottom, (where a whole tile or most of a whole tile should fit) and work up.  After it dried, we removed the board and placed the lower ones.  Those had to be propped up by spacers.

After a few rows of diagonal tiles, I used three rows of brick pattern, honed marble.  I bought them on Ebay and they rock!  After that, we switched to the offset brick tiles up top.  After that, we used what was left of the marble to wrap around the sides and top of the walls.  This gives it a more finished look (plus, I had extra!)

Here is the [mostly] finished shower:  

We still need to cut out two tiles that will have the shower heads sticking out (one shower head is regular and the second one is a hand-held).  We also need to wrap the bench in something.  We couldn't decide between small [wall] tile – set on a diagonal or set square, large floor tile (20x20 rather than 13x13), or (what we picked) running the shower floor tile up the bench.

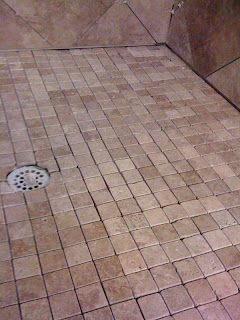
Here is the floor:
It is tumbled marble, and luckily, matches the travertine bench and travertine-look tile perfectly!  

Note: Some of these pictures don't do the tile justice.  Some photos have an orangish tint.  The last photo and the close-up of the tile are accurate representations of color.

Thursday, March 19, 2009

Starting to look like home


I haven't posted an exterior photo in a while, because not much has happened, until recently.  We have a garage door!  You can't see from here, but it's the Carriage House style-without any windows.  And, we got the yard leveled, ready for our driveway.  Unfortunately, the lot isn't exactly ready for a driveway.  We need to have our grinder pump installed before they pour the sidewalk (since they will be bringing in heavy machinery through that area, it could get cracked -like the last one).  BUT they can't find where our sewer line is.  That cute little post that marks where it is?  Yeah, it's in that pile of garbage at the bottom of the photo. Oops!  So as soon as they find the line, they will install the grinder pump, followed by the driveway, followed by sod.


Inside, things are coming along too.  This is the hallway that leads from the garage to the master bedroom.  1. We have working lights!  2. All the trim is done.  3. All the doors are painted. 4. The floor is down (we will just go back right before we move in and grout it.)

It's so great to have everything coming together.  Our deadline to move in is April 11.  We will make it.  Even if I have to sleep on the carpet!  

Wednesday, March 18, 2009

Tile

We bought our tile at National Home Center, special order for $1.99/sq. ft.  This is the Mirador (style) Mohawk (brand) Brown Pearl (color).  The floors have 20 inch x 20 inch tiles and the shower (not shown because it's not done!) will have matching 13 inch x 13 inch tiles.

This is the hallway from the master to the garage.  We (by we, I mean my husband and his brother) laid the tile on a diagonal.  I think it gives it a really grand look (but, it also created more waste than if we had just laid it straight).  
I was on a business trip when this floor went down, so I was a bit nervous... But they did a great job.  And the next day, I got my hands dirty and laid the tile in the laundry room.  I might have had to crawl out the window. (I know you are supposed to start in the back corner and work your way out, but the hallway leads straight into laundry room, so I had to pick up the pattern there.  And I would have posted a pic, but we ran out of tile.  And had to order more.  I picked that up today (along with a 50 gallon Marathon water heater), so we will finish sometime this week.

The same tiles are in the master bathroom, but to change it up a bit, we (again husband and brother) laid it on a brick pattern. The shower will be on a diagonal, so we thought it would be overwhelming and maybe odd looking to have everything diagonal in the room.

Tuesday, March 17, 2009

Green and gorgeous


We picked up our bamboo flooring last week.  We bought it at Lumber Liquidators, and they don't deliver.  So, we borrowed a truck.  How hard could it be, right?  
It was an interesting challenge to say the least.  We waited while another couple got theirs loaded into their truck. How much did they order? we asked each other.  Ours should be a little more than that, right?
No.
Not.
Even.
Close.

Just to give a proper reference, This is an F-250 (not a small truck) and Brad is 6'4" (not a short guy).  We only had to drive a few miles.  It was rush hour, so the interstate would have probably been a good option (we could have sat in traffic inching along).  Instead, we went the back roads, avoiding major streets.  Brad drove while I stared out the window behind me, making tiny gasping noises every time the pile swayed.  It was an odd experience, having 20 smiling versions of Ty Pennington's face staring back at me.  
We made it to the house without incident, except, at that point, we had to unload it.  All fifty boxes.  And they each weighed about 20 lbs.  My arms were tired and I had a bruise on my hip by the time we finished.  And, we haven't even installed it yet.

The bamboo will cover the entire great room (about 1,100 sq. ft.) and run into the pantry.  But, the thing with wood/bamboo floors, you have to have them in the house to acclimate them to the temperature for a couple of days.  As of this writing, we don't have heat/air turned on.  (We should have gotten it today, but at the pace our electrician works, I'm not holding my breath).

Here is a close-up of the wood.  It's so dark, that the characteristics you normally have in bamboo are almost unseen, making it look more like wood than bamboo.  But the bamboo is a renewable resource (hence the 'green' reference in the title) and cheaper.  We paid $3.39/ sq. ft.  The color is called Sambuca. 


Monday, March 16, 2009

The kitchen continues

Brad pointed out that I had not posted a photo of the kitchen lately.  So, here it is.

The island is stained, the granite is installed, the large piece over the stove is in, and the sink is waiting for its faucet.  The only thing missing? That cabinet on the back wall to the left of the large piece.  Um, yeah, about that.  I might have not paid full attention when ordering the cabinets.  We wanted the piece to be perfectly centered so we bought two 20 inch cabinets to flank it.  BUT the cabinets on the bottom, well they did not.  So in order to have the black piece centered over the stove cabinet, we had to special order another cabinet there - an 18 inch.  And the other side really needed a new one too, a 24 inch, but we couldn't bear buying two more special order cabinets, so we opted to use a piece of filler.  We got the replacement cabinet a few days ago, but haven't been able to install it yet.

This is the glaze that we will put on all the white cabinets.  It kind of looks gross and dirty this up close, but we did it to our last kitchen and it turned out fab.  
Just wipe the glaze (cabinet stain -you can order it from Lowe's or Home Depot) on and wipe off as much as you want.  We leave a small amount all over the surface, and more in the cracks.  Let dry (may take a few days) and cover with poly.

Tuesday, March 3, 2009

Lights


Just a quick update, we had a productive weekend.  Photos now, updated explanation later!

Update:  
This is the ceiling fan in the living room, we have the same one in the master bedroom as well.  I love this one because it's the only one that I could find with the dark wood blades (to match the bamboo floors) and the blades are encased in this cool metal thing that spins. That makes no sense.  I will post a close up pic later.

This is the chandelier for the dining room.  Can you believe we found it on sale at National Home Center for only $100?
This little guy is hanging over the space where our pool table will eventually sit.  Until now, it's just a hazard for Brad to walk into.
This is the slate floor in the spare bathroom.  I laid it myself and Brad made all the cuts!
Brad was a tiny bit perturbed when I had loads of this stuff delivered.  Rosettes, base caps and tons of fluted molding!  Until we started hanging it.  Talk about cheating! No mitered cuts!


Thursday, February 26, 2009

The kitchen comes together

The granite is completely installed and we got an amazing deal on it!  
There was a tiny bit of miscommunication (in that I don't think we actually told the granite guy we changed our minds...) and we ended up with the Black Galaxy instead of the Absolute Black.  So there are tiny little gold flecks.  But I think they look brown and will tie into the cabinets really well once we antique them.
Here is the kitchen from a distance.  The island is New Venetian Gold (there's a great vein running though it that you can barely see from here)
Here is a close up of the sink.  It's a granite composite (we were offered a free sink, but it would have been stainless steel, and free is good, but all my fixtures are Oil Rubbed Bronze, so we thought the grey/black look of the granite would work best.  OK, Brad didn't actually care, but I did!).  We bought one from Home Depot, but when we gave it to the granite guys, they noticed that it had a funny back lip that slanted.  Which was a design feature to hold an in-sink cutting board, but would have looked strange.  So we took it back, and bought this one from Lowe's (And it was about $80 cheaper, which was great!)

This is the small side wall by the refrigerator cabinet.  I still LOVE the microwave cabinet!  These are a great solution if you don't want to do the mircohood vent or have it sitting on your counter.  We originally wanted to have a really cool roll-top cabinet that sat on the counter where we could hide the microwave and other small appliances, but when we decided on the corner pantry, that idea fell to the wayside (because it would have been in the corner - and now there's no corner).
And the last wall we got completed (at around 5 pm on Sunday) is the stove wall.  Instead of dropping a bunch of extra cash on a stove cabinet that is deeper and adding decorative spacers with legs (that whole set up would have cost $600!!!), we pulled the cabinet out from the wall 4 inches and wrapped the sides in bead board.  Before we stain it, I might add two small round "feet" under the edge to really make the stove area pop and look like a piece of furniture.  The added a rounded edge around the stove area, which is the feature that I really wanted!  So, we have a very high-end looking kitchen, but at a fraction of the cost.  

Total cost on cabinets= $5,500
Total cost on granite= $3,500

Monday, February 23, 2009

So, it began...


We started on the mountain of trim!  Sadly, Lumber Liquidators has let us down, and our wood is not in at the expected time.  AND because of some "regulations" at National Home Center, our tile is not in yet either.  *Sigh*  So, we had to address the trim - despite extreme resistance on my part! We painted all of our trim with Semi-gloss, Antique white (right off the shelf) from Lowe's.*
This is the set-up in the garage:
And after several hours, three coats each, we have:
At 16 foot long each, and about 25 of them, we have about 400 linear feet of base board.  I really hope that's enough!  Next, we tackle the fluted molding I just had to have, as well as the rosettes and base caps.

*While at Lowe's picking up our bathroom vanity cabinets, I got to have this conversation:
Guy: So, you guys are in here a lot.
Me: Yeah, we're building a house.
Guy: I used to see you guys in here, like, every day.
Me: Well, it takes a lot of planning.
Guy: I haven't seen you lately, so I figured you finished.
Me: Nope, really just now getting started.
Guy: Alright, well, guess I'll see you tomorrow then.
And then I REFUSED to go back later that night when Brad suggested we pick up some painting supplies. (Which meant that we ended up going three times on Saturday!) We go there so often, I duck or turn my head so the carpet guy wont see me.  He seems to be the only one who finds our frequent visits funny.  And the nice lady in the shelving department followed us back there (without us asking) because she knew what we needed.
Saddest part?  I can tell you all their names. But I wont.


Tuesday, February 17, 2009

In the very near future...

I'm going to have to address this very large pile of trim.
It will need several coats of antique white paint and cutting.  Of course, that's after we drag it into the garage! (And THAT depends on when the garage door gets installed.)
All the doors (and the windows in the master and great room) will have fluted trim (that's the ones with all the cute lines) topped with rosettes at the top and base caps at the bottom.  The windows [might eventually] have a very difficult stacked top trim consisting of a base cap (or something like that) then MDF then crown molding.

Monday, February 16, 2009

There is so much going on right now, that I hardly have time to eve write about it!  This past weekend we finished up hanging the kitchen cabinets.  Technically, we kind of finished last weekend, but there was some 'scope creep' (a little industry lingo meaning that someone changed the original project by adding on – and yes, that someone was me) and it took a little longer but looks awesome!
First, I might have suggested that the microwave cabinet be pushed out with two 2x4's so that in addition to being taller, it would also be larger (which would help the crown molding fall on the side, rather than hit the door).  BUT, if we are going to have the sides stick out, they should probably be wrapped in bead board (like the stove cabinet).  

AND, we might have bought the wrong size bead board, causing us to go BACK to Lowe's again.  BUT, I told them (husband and his brother) that it was OK, because they could get it when they get the bead board for the refrigerator cabinet that needed to be built.  
THEN I realized that the guys from Casa Blanca Granite and Marble said they would install the granite sometime early this week, and well, if the granite is being installed, shouldn't we have the corbels and bead board on the island before?  So, we stopped the door painting and went to Home Depot to buy that.  And again, it looks awesome. 

When we bought our cabinets, we could have bought matching boards to wrap around the back, but they were $70/ each and we would need 4.  Instead, we bought two sheets of bead board (@ $35 each) and ordered the matching stain with the cabinets.  That will occur sometime in the near future.
The kitchen is well on its way and I couldn't be more excited.  We bought a sink with a single bowl that is pretty huge!  It's black composite granite.  And despite a previous post about the granite, we changed our minds on colors (surprise!) and opted for a beautiful piece of "New Venetian Gold" for the island and "Absolute Black" for the back counter. (Which rocks because I can go back to the really cool crackle pendant lights over the island!)